

Hari ini saya akan mengajar pelajar saya bagaimana untuk bangunkan web langkah demi langkah sehingga akan menghasilkan web seperti di atas.
Persiapan awal saya minta kepada pelajar saya agar muatturun terlebih dahulu dokumen Fail asas yang mengandungi dokumen HTML (index.html), Folder Pic, dokumen gambar dan dokumen Css.

Persiapan awal saya minta kepada pelajar saya agar muatturun terlebih dahulu dokumen Fail asas yang mengandungi dokumen HTML (index.html), Folder Pic, dokumen gambar dan dokumen Css.

Boleh muatturun di sini : Amali HTML
Folder asas ini bertujuan untuk memudahkan pelajar untuk menggunakan tool yang sudah saya sediakan dalam folder ini untuk dimanfaatkan semasa membangunkan website menggunakan kod pengaturcaraan HTML.
Dalam Folder Amali HTML ini, terdapat dokumen HTML bernama index.html . Bukan dokumen ini menggunakan platform untuk mengedit . Dicadangkan anda menggunakan perisian Sublime Text3, Notepad++ atau adobe Dreamweaver.
Langkah 1 - Bina kod asas HTML


<!doctype html>
<html>
<head>
<meta charset="utf-8">
<title>SHORE 2000</title>
<link rel="stylesheet" text="style/css" href="style.css">
</head>
<body>
</body>
</html>
<html>
<head>
<meta charset="utf-8">
<title>SHORE 2000</title>
<link rel="stylesheet" text="style/css" href="style.css">
</head>
<body>
</body>
</html>
Kod 1
Langkah 2 - Masukkan kod elemen Style css
Masukkan kod 2 di bawah perenggan tag <title>
contoh :

<link rel="stylesheet" text="style/css" href="style.css">
Kod 2
Langkah 3 - Tambahkan elemen "background colour" pada body.
contoh :

contoh :

<body bgcolor="#ffffff">
Kod 3
warna background boleh diubah mengikut kod warna yang anda tentukan. Untuk dapatkan kod warna boleh layari laman web ini : HTMLColorcode
Langkah 4 - Masukkan tag table dalam elemen body.
contoh :
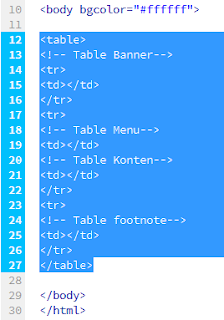
Langkah 4 - Masukkan tag table dalam elemen body.
contoh :

<table>
<!-- Table Banner-->
<tr>
<td></td>
</tr>
<tr>
<!-- Table Menu-->
<td></td>
<!-- Table Konten-->
<td></td>
</tr>
<tr>
<!-- Table footnote-->
<td></td>
</tr>
</table>
<!-- Table Banner-->
<tr>
<td></td>
</tr>
<tr>
<!-- Table Menu-->
<td></td>
<!-- Table Konten-->
<td></td>
</tr>
<tr>
<!-- Table footnote-->
<td></td>
</tr>
</table>
Kod 4
Langkah 5 - setting saiz lebar, center pada table.
masukkan kod 5 pada tag elemen TABLE.
contoh :

masukkan kod 5 pada tag elemen TABLE.
contoh :

<table width="80%" cellspacing="0" cellpadding="0" border="0" align="center">
Kod 5
Langkah 6 - Edit table untuk paparan banner
masukkan kod 6 di bawah comment Table banner.
contoh :

masukkan kod 6 di bawah comment Table banner.
contoh :

<tr><td align="center" colspan="2">
<img src="logo.gif" width="560" height="100" align="center" border="0" alt="Shore '00: Student HCI Online Research Experiments">
</td></tr>
<img src="logo.gif" width="560" height="100" align="center" border="0" alt="Shore '00: Student HCI Online Research Experiments">
</td></tr>
Kod 6
Langkah 7 - Edit table untuk paparan Menu
masukkan kod 7 di bawah comment Table Menu.
contoh :

masukkan kod 7 di bawah comment Table Menu.
contoh :

<td align="left" valign="top"><br>
<a href="http://www.umd.edu"><img src="webglobe.gif" width="73" height="73" border="0" alt="University of Maryland"></a>
<br><br>
<a class="bodylink" href="index.html">Abstract</a><br>
<a class="bodylink" href="introduction.html">Introduction</a><br>
<a class="bodylink" href="experiment.html">Experiment</a><br>
<a class="bodylink" href="results.html">Results</a><br>
<a class="bodylink" href="discussion.html">Discussion</a><br>
<a class="bodylink" href="conclusions.html">Conclusions</a><br><br>
<a class="bodylink" href="acknowledgements.html">Acknowledgements</a><br>
<a class="bodylink" href="references.html">References</a><br>
<a class="bodylink" href="appendices.html">Appendices</a><br>
<a class="bodylink" href="credits.html">Credits</a><br>
<a class="bodylink" href="mailto:im.afzan@gmail.com">Feedback</a><br><br>
<a class="bodylink" href="index.html">Back To Main</a>
</td>
Kod 7
Langkah 8 - Edit table untuk Elemen Konten
masukkan kod 8 di bawah comment Table Kontent.
contoh :
masukkan kod 8 di bawah comment Table Kontent.
contoh :
 |
| Sebelum edit |
 |
| Selepas Edit |
<!-- BEGIN CONTENT -->
<td align="left" valign="top">
<br>
<h1>Comparison of Photo Library Programs</h1>
<h2>Authors:</h2>
<p class=p1>
Iris Cho - <a class="bodylink" href="mailto:iycho@wam.umd.edu">iycho@wam.umd.edu</a><br>
Sean Holman - <a class="bodylink" href="mailto:sholman@wam.umd.edu">sholman@wam.umd.edu</a><br>
Robert Phelps - <a class="bodylink" href="mailto:phelpsrw@wam.umd.edu">phelpsrw@wam.umd.edu</a>
</p>
<br>
<h2>Abstract</h2>
<p class=p1>
<!-- Your abstract summary goes here. -->
As technology advances in digital cameras, scanners, and electronic
storage devices, digital photography has become a method of keeping
photos. Digital photo libraries are needed to provide organization,
presentation, and navigation of these photos. In our experiment, we
compare three photo libraries: ACDSee, PhotoFinder, and PhotoSuite
III. We compare the three in terms of easibility in locating pictures
within the photo collections.
</p>
<P class=p1>
We hypothesized that the three main frame design of PhotoFinder would help
in the easibility of locating pictures. We believed that users would not
only finish the tasks quicker using PhotoFinder, but we also believed that
users would have a higher subjective satisfaction of PhotoFinder. Through
this study, we did find that users finished tasks more quickly using
PhotoFinder.
</P>
<!-- END CONTENT -->
<br>
</td></tr>
Kod 8
Langkah 9 - Edit table untuk Elemen Foot Note
masukkan kod 9 di bawah comment Table Footnote.
contoh :
masukkan kod 9 di bawah comment Table Footnote.
contoh :
 |
| Sebelum Edit |
 |
| Selepas Edit |
<td></td>
<td align="left">
<hr>
<h5><a class=bodylink href="http://www.cs.umd.edu/">Department of Computer Science</a>:
Direct questions and comments to the
<a class=homelinkbottom href="mailto:economi@glue.umd.edu">student editorial team</a></p>
</h5>
<a href="http://www.umd.edu"><img src="primarysm.gif" width=185 height=32 border=0 alt="University of Maryland"></a>
</td>
cikgu kenapa sy buat dia keluar error
ReplyDelete